
Planning Pro in EazyProject, is the project manager’s visual tool for planning employees.
It is recommended to use the latest Internet browser version (like Google Chrome) for the best and fastest user experience.
How to plan your projects
Go to:
User Menu > Scheduling > Scheduling Pro
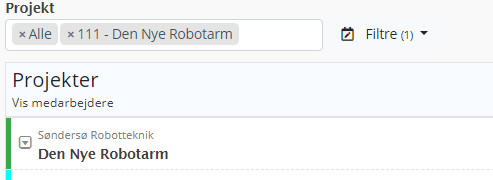
First, select the desired project via the search box, at the top left.
Then you can start planning.
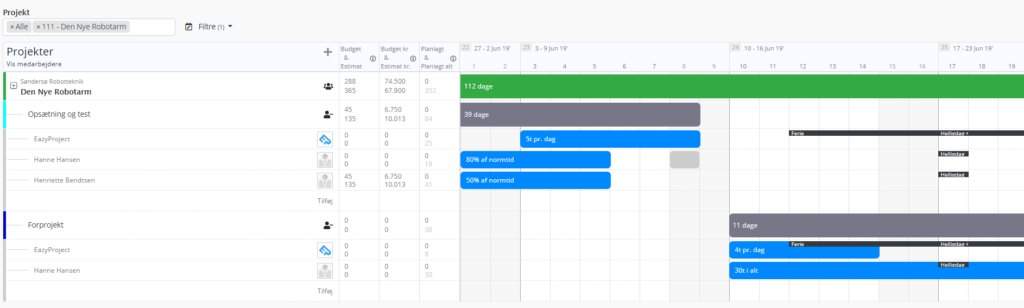
Planning through drag & drop
Overall, the cursor must be placed next to a task.
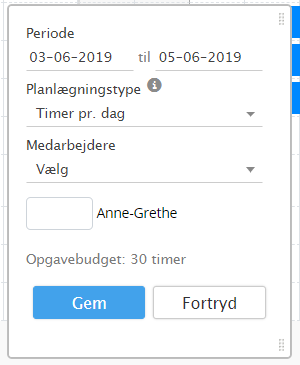
To do this, place the cursor in the desired start date and with the left mouse button held down, drag the mouse to the right until the end date is reached.
A pop-up window will open, here you can define the type of planning, which employee (s) will perform the work, and how many hours or percent of normal time is available.
In the pop-up window you can select three scheduling types:
- Total budget divided by day, total hours available throughout the period
- Budget Period, total hours available throughout the period – if the employee doesn’t register time, planned hours will be pushed in front of him/her
- % of norm time per. day, the percentage of the employee’s daily standard available.
- Hours per day, hours available per. day.
Split features
A schedule can easily be split into two bars by double-clicking on the bar – here a pop-up window opens where you can press split between dxx-xx and dxxx-xx. If the planning type budget in total distributed by day is selected, the budget is automatically divided by 2 when split.
Move an entire project or task
It is possible to move an entire project or task by dragging the project or task bar to the date you want to move to. Then all associated schedules are moved back or forth.
NOTE! This feature is only valid for the Project Viewer.
Change / move employee
Double-click a bar (next to an employee) to open an edit box.
Click shifts under the employee name and select the new employee and click save.
Holidays and holidays
If an employee has planned a holiday, this will also appear in Planning Pro. If you plan on an employee’s holiday, they will enter hours or percent of normal time, not included in the employee’s holiday. The same goes for holidays.
Functions in Planning Pro
In the following, there is a detailed review of the functions in Planning Pro.
Viewing
There are two views in Planning Pro. The view is changed by clicking Show projects or Show employees at the top left of the project names.
- Show projects, show the structure project, task and planned employees
- Show employees, show the structure planned employees, project and task.
Filter
To the right of the project name, the various filters that can be used to define the view in Schedule Pro appear.
It is possible to select multiple values in the fields – whereby the display can be delimited very specifically.
NOTE! The filters are remembered even if you log out.
Heatmap – Load
At the bottom of Scheduling Pro, you can view a heat map by tapping Load on.
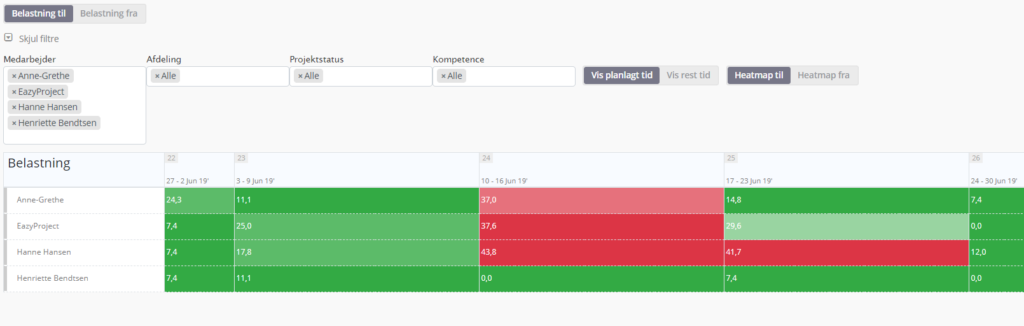
Heatmap shows the employees ‘burden, this is calculated on the basis of the employees’ regularity. You can select the scheduled time if you want an overview of how many hours are planned on the employee.
If you want an overview of how much free time the employee has, choose to have some remaining time.
Filter
You can use filters to achieve the desired display of the employees’ load – of which:
- Employee, limits the display of employees.
- Department, delimited to a particular department.
- Project status, varies based on project status.
- Competence, seek out defined skills.
Adjustments in Planning Pro
At the top right of Scheduling Pro, by pressing the sprocket, you can display various customization options.
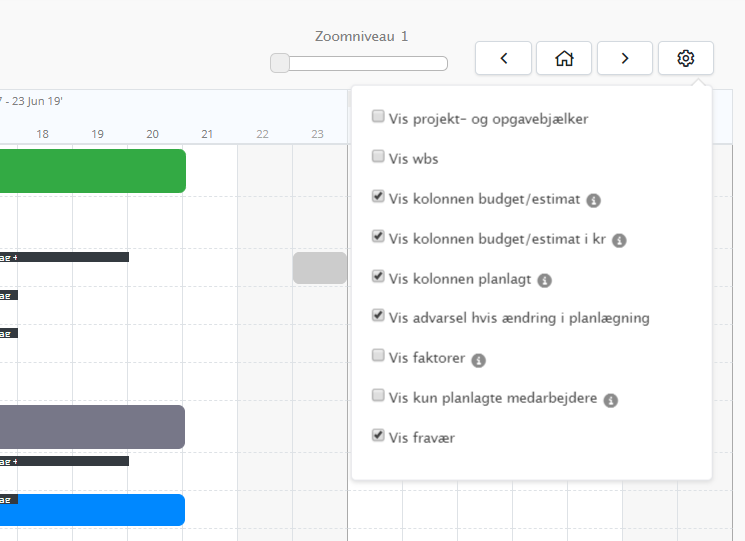
Show project and task bars
Here is illustrated the duration of projects and tasks, in relation to the original start and end dates. This is illustrated by a thin black timeline at the top of each project and task line.
If the duration of the project or tasks changes, the black timeline will thus illustrate the project’s original schedule.
Show wbs
Here, the wbs (work breakdown structure) number in front of each task is shown.
The Wbs structure is created automatically based on the sorting and indentation of the tasks.
Show the budget / estimate column
Here is a new column with two numbers, budgeted and estimated time.
NOTE, this column is only displayed in “Show Projects” view.
- The budget figure shows task budgets in hours. The project budget is the sum of task budgets.
- The number estimate shows the sum of hours scheduled from the d.d. and forward + the sum of time records less than d.d.
Show the budget / estimate column in kr.
This corresponds to the above budget / estimate, however, the starting point is DKK instead of hours.
Show the column scheduled
Here is a new column with two numbers, planned and planned everything.
NOTE, this column is only displayed in “Show Projects” view.
- The number planned shows the sum of hours scheduled from today and onwards.
- The number planned all shows the sum of all hours scheduled, also hours scheduled earlier than the d.
Show warning if change in planning
If this feature is checked, a red symbol will appear next to each project when planning changes. By pressing the red symbol, the changes in the planning are transferred to the employees’ task allocations.
Show factors
Here is a new column with two numbers, Ambition factor and Allocation factor. At the same time, these factors appear at the top of Planning Pro. Factors are calculated pba. the projects shown.
- Ambition factor is a value entered on the project.
- Allocation factor, calculated from: planned selling price / planned cost price.
NOTE! Factors are shown only in the “Show Projects” view.
Only show scheduled employees
Here only the employees who are planned on the tasks are shown
Show absence
Here, scheduled absence (holiday and holidays) is displayed next to the allocated employees.
Create a project directly in Planning Pro
Normally, a project is created using the project form in EazyProject, however, it is possible to do this directly via Planning Pro.
Create project
Click on the top plus icon in the header line.
A pop-up window opens where you can enter information about the project.
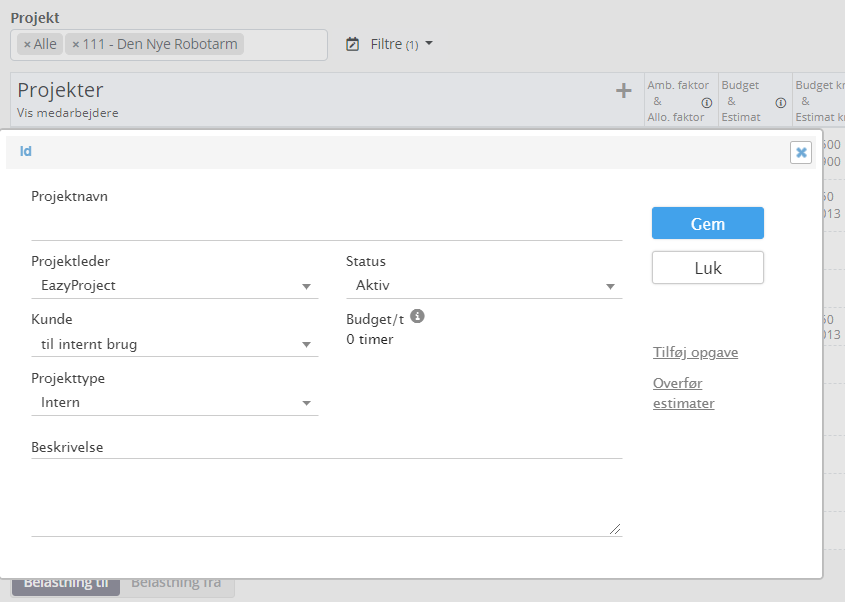
Create task
If you want to create tasks for the project, this is done in the pop-up window by pressing add task. Then a new pop-up window opens where you can enter information up the task. You open the pupup window by pressing the project name.
Edit project and tasks
If you want to correct a project, do so by pressing the project name. If you want to correct a task, do so by pressing the task name.
Delete project and task
If you want to delete a project, tap the project name and then delete the project.
To delete a task, tap the task name and then delete the task.
Note! A project and associated tasks cannot be deleted if time records are stored on the project’s tasks.
Completed projects and tasks
It is possible to complete a project or task by clicking on the project or task name and selecting a different status.
If a project is completed, it can be found using the filtered project status.
Please note that completed tasks are NOT displayed in Planning Pro.
If in the project status the filter is selected other filters than active, the completed projects will be marked with a gray color next to the project name.